Introducing iommi, part 2
Continuing from part 1:
- Pages
- cell__format
- cell__url
- Table filters
- Forms
- Automatic forms
- Automatic views
- Actions
- cell__template
- row__template
- Menus
- Admin
- Wrap up
Pages
So far we’ve just created a table, but often you want something a little more
complex, especially for your index page. iommi has a concept of a Page that
is used to build up a bigger page from smaller building blocks. Let’s build
out our simple web app to have separate pages for albums, artists and tracks:
path('albums/', Table(auto__model=Album).as_view()),
path('artists/', Table(auto__model=Artist).as_view()),
path('tracks/', Table(auto__model=Track).as_view()),
and an index page:
class IndexPage(Page):
    title = html.h1('Supernaut')
    welcome_text = 'This is a discography of the best acts in music!'

    artists = Table(auto__model=Artist, page_size=5)
    albums = Table(auto__model=Album, page_size=5)
    tracks = Table(auto__model=Track, page_size=5)
with a url definition like this:
path('', IndexPage().as_view()),
html is a little fragment builder to make it easier and faster to build
small html parts. html.div('foo') is just a more convenient way to write
Fragment(tag='div', children__text='foo'). Fragments are used internally
throughout iommi, because they allow you to define a small bit of html that
can be customized later. Let’s look at an example:
>>> class MyPage(Page):
...    title = html.h1('Supernaut')

>>> MyPage().bind().__html__()
'<h1>Supernaut</h1>'

>>> MyPage(parts__title__attrs__class__foo=True).bind().__html__()
'<h1 class="foo">Supernaut</h1>'
This is used throughout iommi to provide good defaults that can be customized easily when needed.
A Page can contain any Part (like Fragment, Table, Form, Menu,
etc), or plain strings. Escaping is handled like you’d expect from Django
where strings are escaped, and you can use mark_safe to send your raw
html straight through.
For our demo we’ll also introduce a page for an artist:
def artist_page(request, artist):
    artist = get_object_or_404(Artist, name=artist)

    class ArtistPage(Page):
        title = html.h1(artist.name)

        albums = Table(auto__rows=Album.objects.filter(artist=artist))
        tracks = Table(auto__rows=Track.objects.filter(album__artist=artist))

    return ArtistPage()

urlpatterns = [
    # [...snip...]
    path('artist/<artist>/', artist_page),
]
Note here how we specify auto__rows to supply a QuerySet instead of a
model. This is very convenient in many cases, and is otherwise the same as
specifying auto__model and rows.
cell__format
In iommi you can customize the rendering on many different levels, depending
on what the situation requires. The last layer of customization is
format which is used to convert the value of a cell to a string that
is inserted into the html (or CSV or whatever output format you are targeting):
class IndexPage(Page):
    # [...snip...]
    albums = Table(
        # [...snip...]
        columns__artist__cell__format=lambda value, **_:
            format_html('<a href="/artist/{}/">{}</a>', value, value)
    )
    # [...snip...]
columns__artist__cell__format should be read as something similar to
columns.artist.cell.format. This way of jumping namespace with __ instead
of . (because . is syntactically invalid!) is something Django started
doing for query sets and we really like it so we’ve taken this concept further
and it is now everywhere in iommi.
The other levels of customization are value which is how the value is
extracted from the row, attr which is the attribute that is read (if
you don’t customize value), and lastly template which you use to override
the entire rendering of the cell (including the td tag!).
You can also override template on the row to customize the row rendering.
Again this includes the tr tag.
cell__url
A very common case of tables is to show a link in the cell. You can do that
with cell_format and cell__template like above, but it’s such a common
case that we supply a special convenience method cell__url for this. Let’s
make the artist column link to the artist page in our table. First we add
a get_absolute_url on the model, then replace the
columns__artist__cell__format we had above with:
class IndexPage(Page):
    # [...snip...]
    albums = Table(
        # [...snip...]
        columns__artist__cell__url=lambda value, **_: value.get_absolute_url(),
    )
    # [...snip...]
Much better!
But actually, this is such a common case that we do this by default for you
for ForeignKey columns if the target model has get_absolute_url. So we
can just remove the columns__artist__cell__url specification entirely. But
we do want the name column to link to the album page so the total definition
becomes:
    albums = Table(
        auto__model=Album,
        page_size=5,
        columns__name__cell__url=lambda row, **_: row.get_absolute_url(),
    )
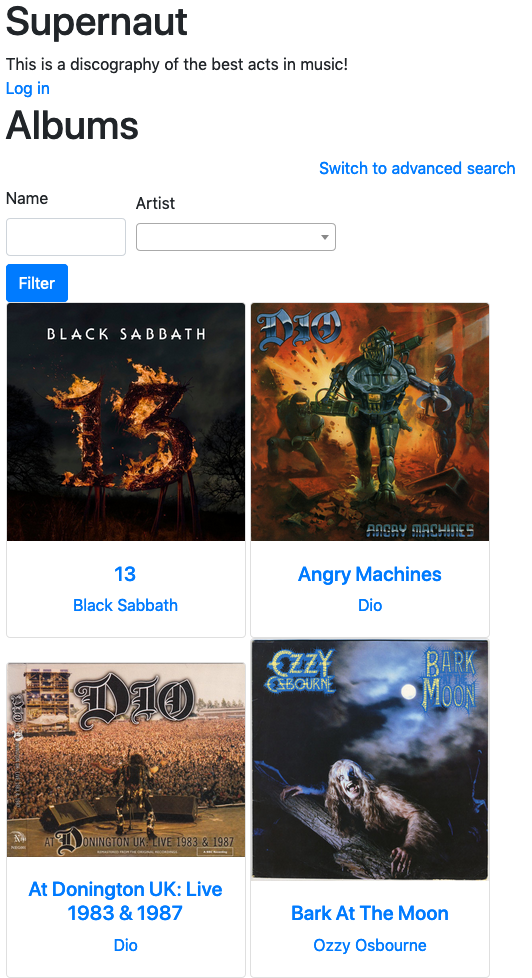
Table filters
It’s very often we want the ability to filter lists, which is why iommi also
provides this. To enable a filter make sure include is True for the filter
of a column. We enable filtering for name, year, and artist:
    albums = Table(
        # [...snip...]
        columns__name__filter__include=True,
        columns__year__filter__include=True,
        columns__year__filter__field__include=False,
        columns__artist__filter__include=True,
    )
columns__year__filter__field__include=False means we turn off the Field in
the form that is created, but we can still search for the year in the
advanced search language.
To handle selecting from a choice field that is backed by a QuerySet that
can contain thousands or millions of rows, iommi by default uses a select2
filter control with an automatic ajax endpoint. You can read more about this
in the full documentation. The automatic endpoint is handled by iommi on the
same url as the view. An advantage to this approach is that we only need
to be sure our view has the correct permission checks and then we also know
the select box (or ajax endpoint) has the same checks. This makes it easy to
reason about the security of the product.
The advanced filter means users can write queries like year>1960 and title:war
to find albums published after 1960 and that contain the word “war”.
Forms
iommi also comes with a library for forms. This can look very much like the forms library built into Django, but is different in some crucial ways. Let’s look at the most basic example from the Django documentation:
from django import forms

class NameForm(forms.Form):
    your_name = forms.CharField(label='Your name')
<form action="/your-name/" method="post">
    {% csrf_token %}
    {{ form }}
    <input type="submit" value="Submit">
</form>
In iommi the same is written as:
from iommi import Form, Field

class NameForm(Form):
    your_name = Field.text()
And in the template:
{{ form }}
In iommi you always get a form encoding specified on the form, so they all work
with file uploads. Missing form encoding on the form tag is a very common
stumbling block for beginners. You also get a submit action by default which
you can configure via actions__submit:
from iommi import Form, Field

class NameForm(Form):
    your_name = Field.text()

    class Meta:
        actions__submit__display_name = 'Save'
In iommi we use class Meta a lot, similar to Django, but in iommi it’s not
just a bucket of values that someone might or might not read, it has a precise
definition: values in Meta are passed into the constructor. So the example
above is roughly the same as:
NameForm(actions__submit__display_name='Save')
Worth pointing out is that values of Meta are defaults, so you can still
override at the constructor call.
An advantage to this strict definition is that we don’t have silent failures
in iommi. If you make a spelling mistake in a value in Meta, you will get
an error message.
Automatic forms
iommi can also derive forms from Django model definitions:
Form(auto__model=Artist). You can specify which fields to include or exclude
via auto__include or auto__exclude, and the fields can still be customized
fully. An example of this could be to insert a CSS class foo on the label
tag of a field name:
form = Form(
    auto__model=Artist,
    fields__name__label__attrs__class__foo=True,
)
There are many many more customizations options available, you can find more
in the HOWTO and the docs
for Field.
Automatic views
iommi goes a step further than this though, by supplying full views that can
be used from either a declarative form or an auto generated form. An example
is to have a create view for an Artist:
urlpatterns = [
    path('create/', Form.create(auto__model=Artist).as_view()),
]
There are three built in forms/views like this: create, edit, and delete.
The delete view is a read only form with some styling for the submit button
and a submit handler that delete the object. We find this to be really nice as
a confirmation page because you can see what you are about to delete.
Actions
An Action in iommi is a link or a button. We use them for submit buttons of
forms and for links that you can add to a part. A common use case is to add
links to a table. In our example app we want to add a create button for staff:
class AdminTable(Table):
    # [...snip...]
    class Meta:
        # [...snip...]
        actions__create_album = Action(
            attrs__href='/albums/create/',
            include=lambda request, **_: request.user.is_staff,
        )
cell__template
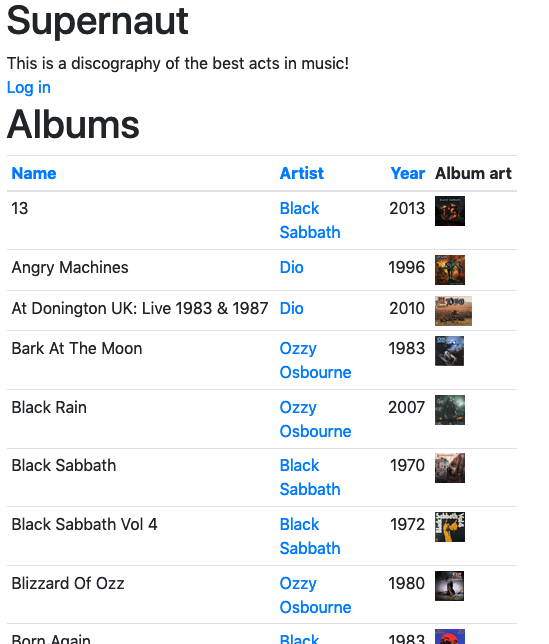
Now that we have a basic app, we’d like to customize the look of the index page a bit. A plain html table with text doesn’t look very cool, so we will spice it up with album covers. This is what it looks right now:

We’ll start by removing the artists section.
A custom cell template might be a good start to make it look nicer. The demo app ships with images, we just need to link to them:
albums = Table(
    auto__model=Album,
    columns__album_art=Column(
        attr=None,
        cell__template=Template('''
            <td>
                <img
                    height="30"
                    src="/static/album_art/{{ row.artist }}/{{ row.name }}.jpg">
            </td>
        '''),
    ),
)
That’s a start, but we want something a bit more showy, let’s get rid of html tables entirely:
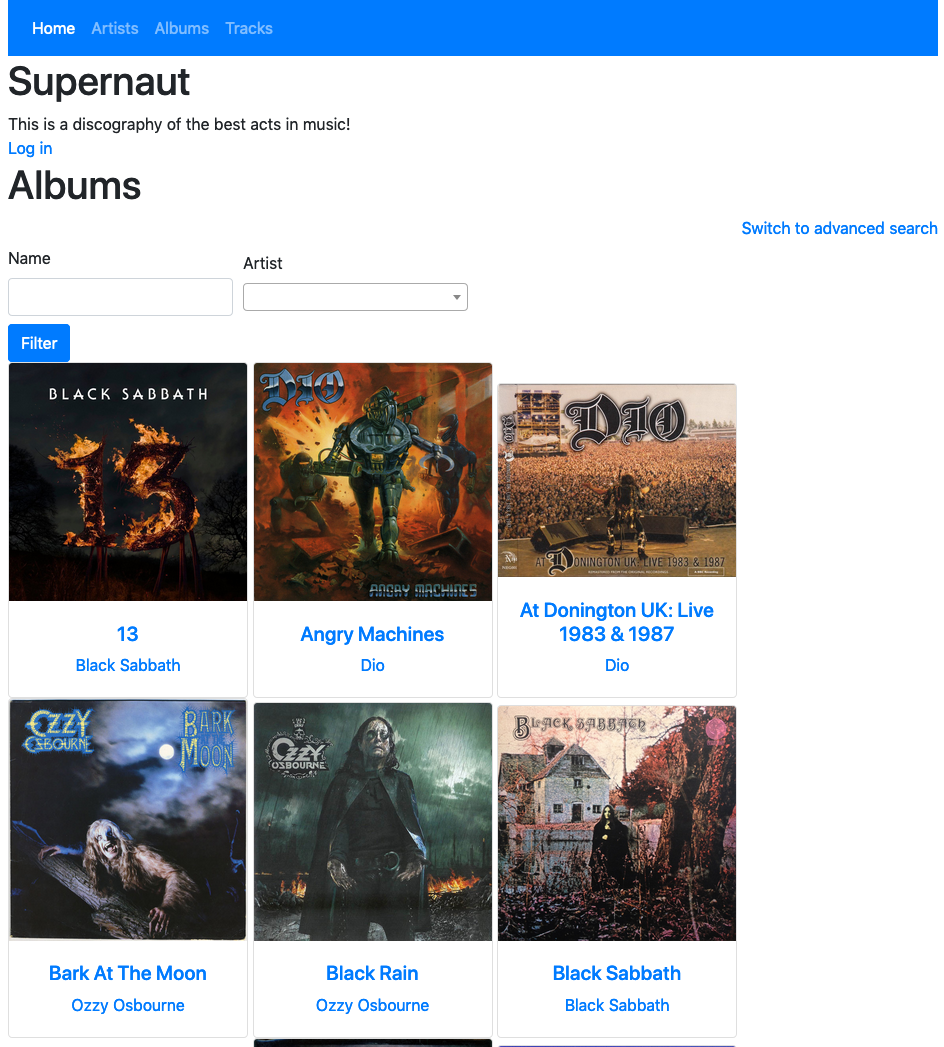
row__template
To override the rendering of an entire row we use cell__template. We also
change the table from rendering a table tag to a div, and turn off the
table header:
albums = AlbumTable(
    tag='div',
    header__template=None,
    row__template=Template("""
        <div class="card" style="width: 15rem; display: inline-block;" {{ cells.attrs }}>
            <img class="card-img-top" src="/static/album_art/{{ row.artist }}/{{ row.name|urlencode }}.jpg">
            <div class="card-body text-center">
                <h5>{{ cells.name }}</h5>
                <p class="card-text">
                    {{ cells.artist }}
                </p>
            </div>
        </div>
    """),
)
(You can specify the name of a template file here instead of writing the template inline like this. This way is nicer for small things and quick demos.)
Now we’re almost at the full app screenshot at the beginning of part 1, we just have the menu at the top left.
Menus
iommi also has a menu system. It follows the same patterns we’ve seen so far. For this example app we’ll do something simple:
class SupernautMenu(Menu):
    home = MenuItem(url='/')
    artists = MenuItem()
    albums = MenuItem()
    tracks = MenuItem()
By default the url becomes the name, so the artists menu item becomes /artists/.
Adding it to the index page:
class IndexPage(Page):
    menu = SupernautMenu()

    # [...snip...]
and we’ve arrived at the screenshot I promised at the beginning of part 1:
Just one more thing…
Admin
With these high level abstractions we’ve seen so far (pages, tables, queries, forms, fragments) we can easily build more powerful components. Which is what we’ve done with the administration interface built into iommi. Installing it is as simple as:
class MyAdmin(Admin):
    class Meta:
        pass


urlpatterns = [
    path('iommi-admin/', include(MyAdmin.urls())),
]
Customization is easy with IOMMI_DEBUG on (default on if DEBUG is on),
here’s how to use the pick tool:
You can override an entire field rendering with template, the template
of the label with label__template, the name of a field with display_name,
add a CSS class to the label tag with label__attrs__class__foo=True, and
much more. Customization is at all levels, and in all these cases you can
supply a callable for even more flexibility.
More about the admin in the iommi docs.
Wrap up
I’m glad you read this far! This has been a very shallow introduction, but I’ve touched on all the major parts in some way, and there is a lot of material to cover. I hope you want to give iommi a try.
The full documentation is at iommi.rocks, and we are on github at TriOptima/iommi. This example project is at boxed/Supernaut.