Introducing iommi
I am very excited to reveal something me and my colleague Johan Lübcke have been working on for quite some time now: iommi. This is a high level framework built on top of Django.
This is primarily a library for developing traditional web apps, but we believe it’s also a solid foundation to build SPAs and APIs going forward. Watch this space. But for now, let’s get started!
I will build a discography app (you can find
the code on github with separate commits
for each stage of the apps evolution). To make this simpler for demo purposes
I will put all my views inside urls.py
so we don’t need to jump around between different files too much.
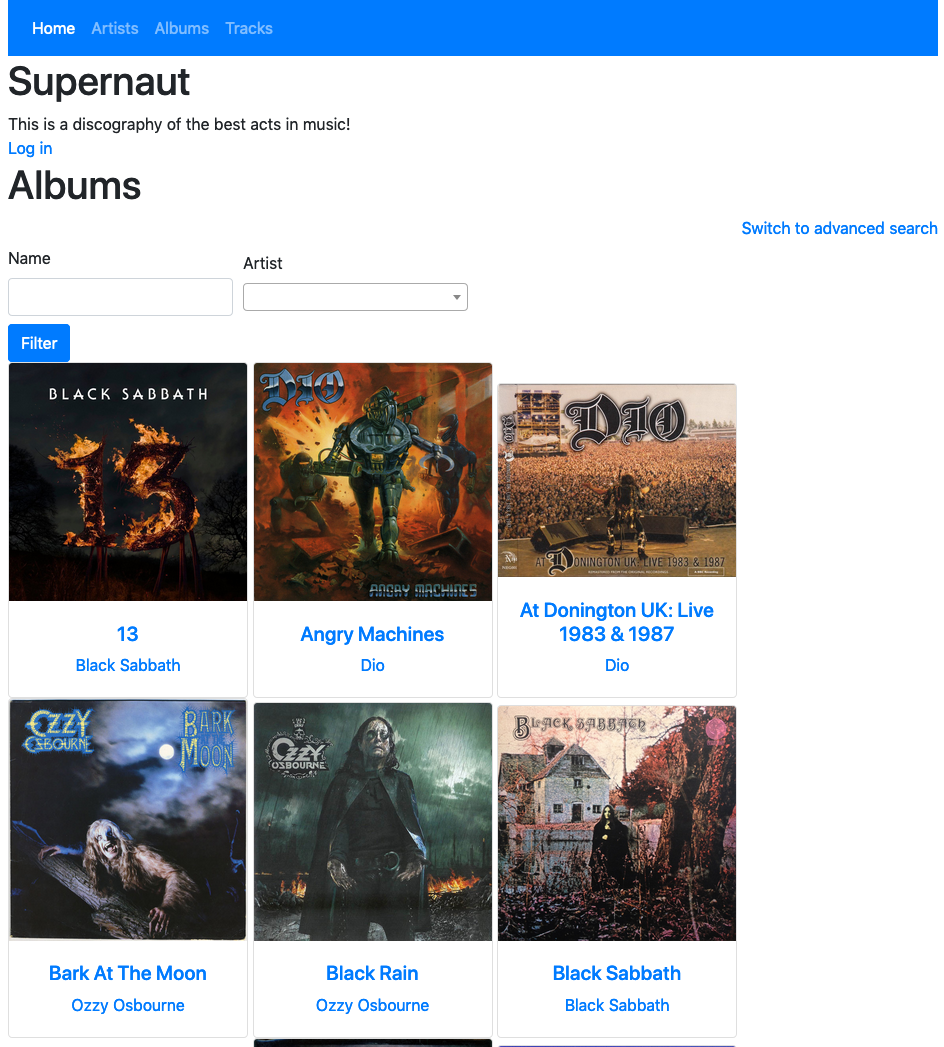
At the end of this 2 part blog series we’ll end up with 4 pages (plus the iommi admin), with custom table, row, cell rendering, filtering, pagination, the advanced query language, and a menu. The index page will look like this:
This library is a union of our previous libraries tri.form, tri.query and tri.table but we’ve collected all our grievances and architectural problems and dealt with them the way you can only do if you are free to let go of backwards compatibility. We’ve also added some new features built on this new foundation that we’ve been thinking about for a few years.
This presentation is also available on YouTube.
- Django setup
- Django models
- The most basic app
- Install iommi
- Declarative table
- Simplify!
- Using as_view
- auto__model
Django setup
Let’s create the venv:
mkdir Supernaut
cd Supernaut
virtualenv -p $(which python3) venv
source venv/bin/activate
Then create a Django project, and the main app:
django-admin startproject Supernaut
cd Supernaut
django-admin startapp Supernaut
cd ..
Django models
We create these models:
from django.db import models


class Artist(models.Model):
    name = models.CharField(max_length=255, db_index=True)

    def __str__(self):
        return self.name

    class Meta:
        ordering = ('name',)


class Album(models.Model):
    name = models.CharField(max_length=255, db_index=True)
    artist = models.ForeignKey(
        Artist,
        on_delete=models.CASCADE,
        related_name='albums'
    )
    year = models.IntegerField()

    def __str__(self):
        return self.name

    class Meta:
        ordering = ('name',)


class Track(models.Model):
    name = models.CharField(max_length=255, db_index=True)
    index = models.IntegerField()
    album = models.ForeignKey(
        Album,
        on_delete=models.CASCADE,
        related_name='tracks'
    )
    duration = models.CharField(
        max_length=255,
        db_index=False,
        null=True,
        blank=True
    )

    def __str__(self):
        return self.name

    class Meta:
        ordering = ('index',)
Create migrations and run them to create our database tables:
./manage.py makemigrations
./manage.py migrate
The real project also has a little database that it creates with pre filled data.
The most basic app
We’ll start with the simplest app we can think of, creating a base.html, index.html and a very simple index view:
base.html:
<!DOCTYPE html>
<html>
<head>
    <title>{% block title %}{{ title }}{% endblock %}</title>

    {# jQuery #}
    <script src="https://code.jquery.com/jquery-3.4.1.js" integrity="sha256-WpOohJOqMqqyKL9FccASB9O0KwACQJpFTUBLTYOVvVU="   crossorigin="anonymous"></script>

    {# Bootstrap #}
    <link rel="stylesheet" href="https://stackpath.bootstrapcdn.com/bootstrap/4.4.1/css/bootstrap.min.css" integrity="sha384-Vkoo8x4CGsO3+Hhxv8T/Q5PaXtkKtu6ug5TOeNV6gBiFeWPGFN9MuhOf23Q9Ifjh" crossorigin="anonymous">

    <link rel="stylesheet" href="//maxcdn.bootstrapcdn.com/font-awesome/4.3.0/css/font-awesome.min.css">

    {# jQuery first, then Popper.js, then Bootstrap JS #}
    {# Note that bootstrap tells you to use the slim version of jQuery but this does NOT work with select2! #}
    <script src="https://cdn.jsdelivr.net/npm/popper.js@1.16.0/dist/umd/popper.min.js" integrity="sha384-Q6E9RHvbIyZFJoft+2mJbHaEWldlvI9IOYy5n3zV9zzTtmI3UksdQRVvoxMfooAo" crossorigin="anonymous"></script>
    <script src="https://stackpath.bootstrapcdn.com/bootstrap/4.4.1/js/bootstrap.min.js" integrity="sha384-wfSDF2E50Y2D1uUdj0O3uMBJnjuUD4Ih7YwaYd1iqfktj0Uod8GCExl3Og8ifwB6" crossorigin="anonymous"></script>

    {# Select2 #}
    <link href="https://cdn.jsdelivr.net/npm/select2@4.0.12/dist/css/select2.min.css" rel="stylesheet" />
    <script src="https://cdn.jsdelivr.net/npm/select2@4.0.12/dist/js/select2.min.js"></script>
</head>
<body>
    <div class="container">
        {% block content %}{% endblock %}
    </div>
</body>
</html>
index.html:
{% extends "base.html" %}

{% block content %}
    <h1>{{ title }}</h1>

    {{ content }}
{% endblock %}
urls.py:
from django.shortcuts import render
from django.urls import path

# Views ----------------------------

def index(request):
    return render(
        request,
        template_name='index.html',
        context=dict(
            content='hello',
            title='Title here!',
        )
    )


# URLs -----------------------------

urlpatterns = [
    path('', index),
]
So now that we have a foundation to stand on we will build out the app step by step.
Install iommi
pip install iommi
In Supernaut/settings.py, we add iommi to INSTALLED_APPS and iommi.middleware to MIDDLEWARE:
INSTALLED_APPS = [
    # [...snip...]
    'iommi',
    'Supernaut',
]

MIDDLEWARE = [
    # [...snip...]
    'iommi.middleware',
]
Declarative table
We’ll start with using iommi declarative tables to create a list of albums:
# [... snip ... ]

from iommi import (
    Table,
    Column,
)

# [... snip ... ]

# Tables ---------------------------

class AlbumsTable(Table):
    name = Column()
    artist = Column()
    year = Column()


# Views ----------------------------

def index(request):
    return render(
        request,
        template_name='index.html',
        context=dict(
            content='hello',
            content=AlbumsTable(
                rows=Album.objects.all(),
            ).bind(request=request),
            title='Title here!',
        )
    )
What is bind()?
Table() creates a table definition, and bind() couples it to the request.
In this step all things unique to this rendering is calculated. This is when it
can do the sorting defined by http parameters for example. bind() returns a
new Table that is “bound” and can be rendered.
Simplify!
We can simplify the above quite a bit due to iommis middleware and built in
templates. First we’ll delete our base.html because iommi has one. Next up
is simplifying the index view:
def index(request):
    return AlbumsTable(
        title='Albums',
        rows=Album.objects.all(),
    )
The iommi middleware will handle if you return an iommi type and render it properly.
Using as_view
The two parameters title and rows we passed to AlbumsTable can also be
set on the Meta class like this:
class AlbumsTable(Table):
    name = Column()
    artist = Column()
    year = Column()

    class Meta:
        title = 'Albums'
        rows = Album.objects.all()
(These are defaults so we can still create an AlbumsTable(title='Something else') if we want.)
Now that we have the above we can delete the index view altogether and
replace the url definition with this:
urlpatterns = [
    path('', AlbumsTable().as_view()),
]
(We could have also passed the title and rows parameters here, but that’s
not as nice I think.)
auto__model
The next step in the simplification is to realize that this table is trivially
derived from the model definition. iommi has features to do this for you so we
can simplify even further! We delete the entire AlbumsTable class and replace
the url definition with this single line:
urlpatterns = [
    path('', Table(auto__model=Album).as_view()),
]
The code above gives you this view:
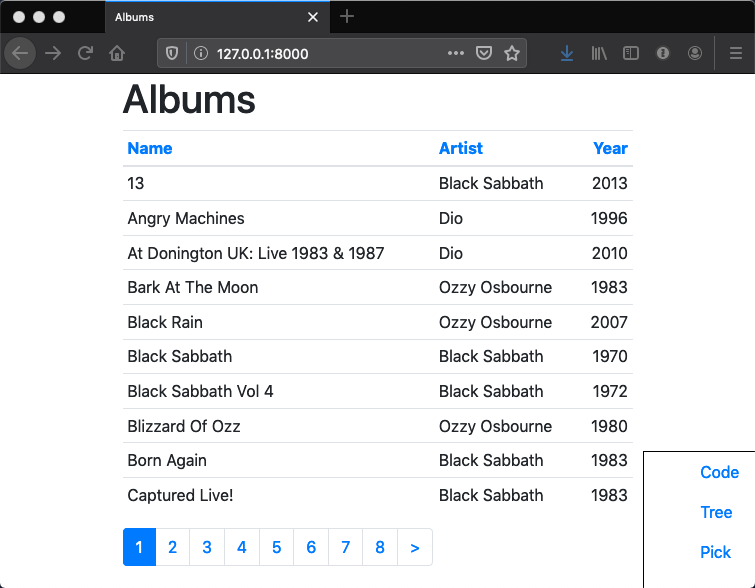
(The only cheat is that I’ve passed page_size=10 to make the screenshot smaller.)
The title of this table is the plural verbose name of the Album model. Again
as stated above, these are all defaults, not hard coded values, so you can pass
title to the Table constructor here to override the title for example.
Continue to part 2 for more!